如果免费资源下载的文件为TXT文档 请联系站长更新!站长微信:Lv596999 Telegram:@eapoj “Mql5官网”板块的EA基本都有,大部分是无限制NODLL版,NODLL版本MT1420升级,大多数不可用!这些EA来源为国外花钱买过来的 如有需要,请联系站长! “EA测评”板块资源全部现有,看见不错的,可以联系站长,看EA在确定是否收费。 “无限制EA”板块,大部分免费,下载文件全部存在,都可以免费下载。 站长硬盘EA太多,因大部分时间做交易,做风控,没太多时间更新下载地址,请谅解! 需要更新下载文件,请联系站长微信!国外朋友请联系Telegram。  |
After working during many months, with the help of Neural Networks, we have perfected the ultimate tool you are going to need for identifying key price levels (Supports and Resistances) and Supply and Demand zones. Perfectly suitable to trigger your trades, set up your future actions, decide your Take Profit and Stop Loss levels, and confirm the market direction.
Price will always move between those levels, bouncing or breaking; from one zone to another, all the remaining movements are just market noises.
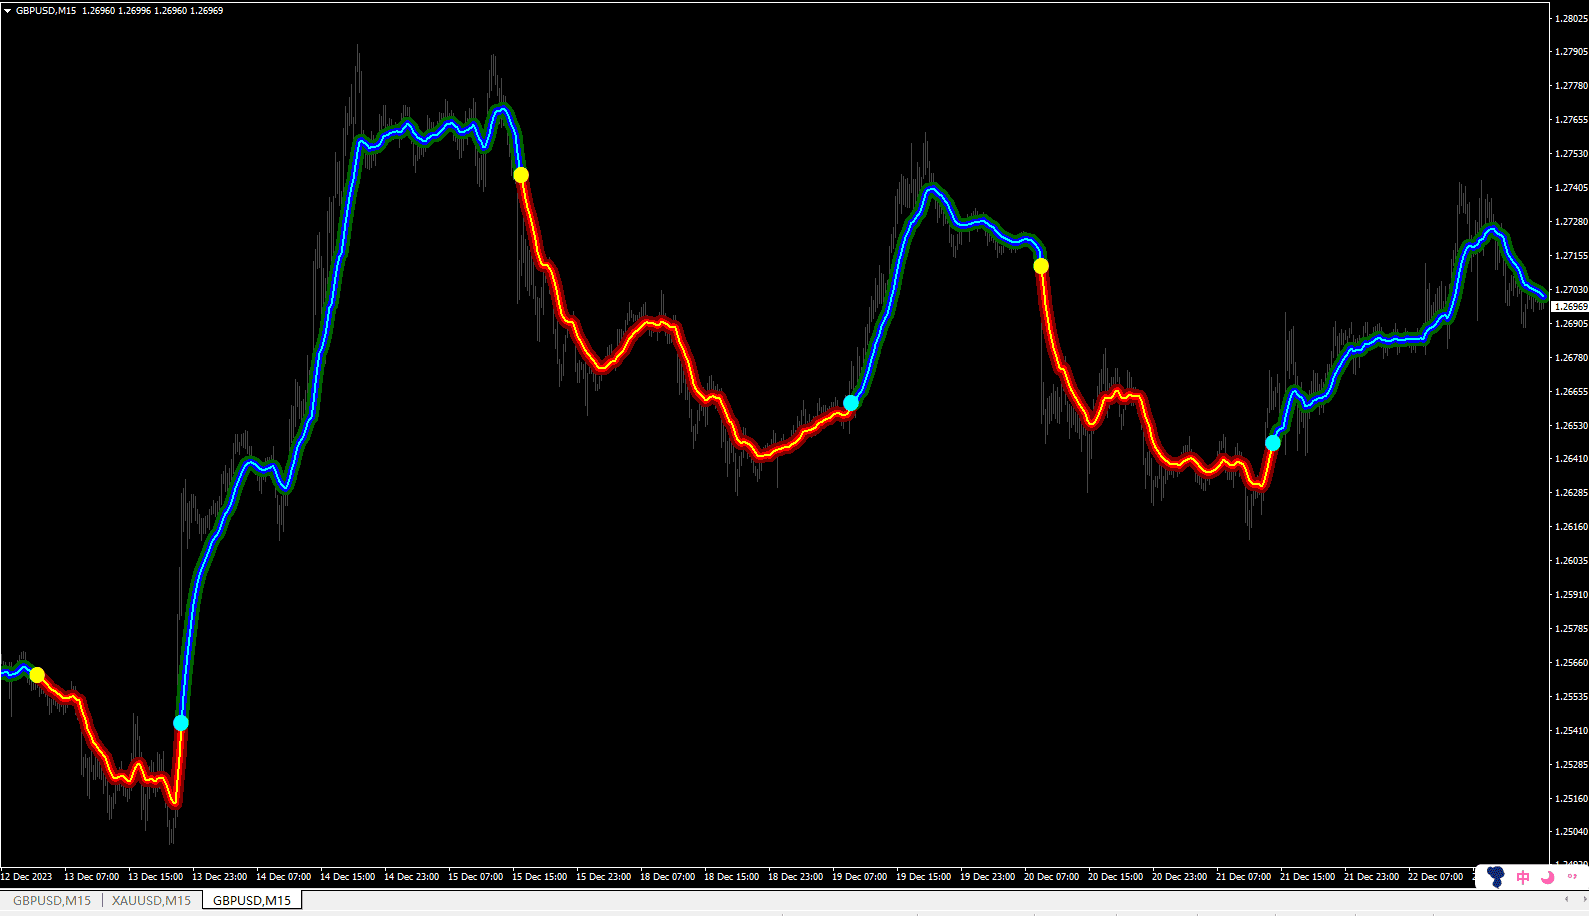
This indicator automatically calculates the key price levels within the last bars where price has strongly reacted one way or another, reversing or breaking and supporting the direction. It helps to anticipate market movements.
You can find all the trading strategies here: https://www.mql5.com/en/blogs/post/748359
When price touches a Supply or Demand zone, it means the price very likely will have some reversal. If prices hesitate or goes with strong momentum, breaking those levels, it’s a clear signal of more continuation of the movement. So, either scenario is a good moment to make your operations because you will have a very good price.
Whenever you enter in one operation, you can use Ultimate Supply Demand to define your Take Profit or Stop Loss. Taking in consideration than price will likely want to touch those zones, when you set your Take Profit some pips before and your Stop Loss some pips after you will have safer profitable trades.
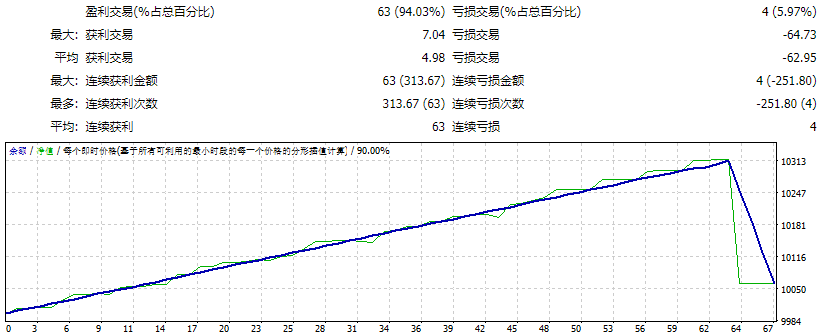
The main goal for this algorithm is to provide analytical insight and potential trading opportunities.
Unique features:
Customizable to find your preferred levels
Simple format settings
Optimized, high speed: it can be backtested really fast
Ready to be used in Expert Advisors
Suitable Scalping or Long Term Trading
No repaintings
It includes a Dashboard
Ready to be used in many Time Frames and Pair
Recomendations:
– Set your Take Profit some pips sooner before reaching the zone/level and you will be more likely to reach it, and end up with profits
– Set your Stop Loss some pips after reaching the zone/level and you will be less likely to loss your trade and avoid fake bad exits
How to Use it:
Step 1.- Attach the indicator and select the settings that works better for you:
.- Select the Deviation and Frequency (explained bellow)
.- Use the Dashboard if desired to easily pick up your prefered settings
Step 2.- Wait for a signal:
.-Wait for a Price to Touch the Levels and decide if price is reversing or breaking
.-Use the other Levels for your Take Profit and Stop Loss
Input Parameters:
- Deviation: Accepted deviation from the Levels to the previous prices. Little value means levels with closer peaks will be considered. Bigger value will have more tolerancy, including then bigger wicks and fake breaks.
- Frequency: To calculate the number of Levels you want, the min width between them. Smaller values means more Levels so less distance between them. Bigger values mean more distance between them so less levels.
(The calculated Levels at any time with all Dev/Freq combinations are suitable for all means. Calculation will always be precise and will give you the key levels under your settings. Deviation and Frequency just act like a customizable feature in order to give the user the option to accurately addapt the levels to his own personal style and use. E.g. if you want to use it for scalping, you want to use more levels so less Frequency; to use it for Grid Levels, you may want to increase the Frequency. Use the Dashboard to easily decide)
- Show Like: To show the final result in form of Levels or Zones
- Show Previous Changes: To show the previous calculations (no repainting). False will show you only the real current level.
- Color/Width Inner/Outer Line/Zones
- Show Dashboard: Show or Hide Dashboard
![图片[1]-Ultimate Supply Demand MT5-EA侦探社 - 全球领先的MQL5官网外汇EA机器人MT4自动化交易EA资源免费分享网站](https://sp-ao.shortpixel.ai/client/to_webp,q_glossy,ret_img/https://www.mql5.vip/wp-content/uploads/2024/04/20240416151719-661e967fb95f4.gif)
![图片[2]-Ultimate Supply Demand MT5-EA侦探社 - 全球领先的MQL5官网外汇EA机器人MT4自动化交易EA资源免费分享网站](https://sp-ao.shortpixel.ai/client/to_webp,q_glossy,ret_img/https://www.mql5.vip/wp-content/uploads/2024/04/20240416151720-661e968002ad7.gif)
![图片[3]-Ultimate Supply Demand MT5-EA侦探社 - 全球领先的MQL5官网外汇EA机器人MT4自动化交易EA资源免费分享网站](https://sp-ao.shortpixel.ai/client/to_webp,q_glossy,ret_img/https://www.mql5.vip/wp-content/uploads/2024/04/20240416151720-661e96802db48.png)
![图片[4]-Ultimate Supply Demand MT5-EA侦探社 - 全球领先的MQL5官网外汇EA机器人MT4自动化交易EA资源免费分享网站](https://sp-ao.shortpixel.ai/client/to_webp,q_glossy,ret_img/https://www.mql5.vip/wp-content/uploads/2024/04/20240416151720-661e96806ac1d.png)
![图片[5]-Ultimate Supply Demand MT5-EA侦探社 - 全球领先的MQL5官网外汇EA机器人MT4自动化交易EA资源免费分享网站](https://sp-ao.shortpixel.ai/client/to_webp,q_glossy,ret_img/https://www.mql5.vip/wp-content/uploads/2024/04/20240416151720-661e9680cc741.png)
![图片[6]-Ultimate Supply Demand MT5-EA侦探社 - 全球领先的MQL5官网外汇EA机器人MT4自动化交易EA资源免费分享网站](https://sp-ao.shortpixel.ai/client/to_webp,q_glossy,ret_img/https://www.mql5.vip/wp-content/uploads/2024/04/20240416151721-661e96810de44.png)