如果免费资源下载的文件为TXT文档 请联系站长更新!站长微信:Lv596999 Telegram:@eapoj “Mql5官网”板块的EA基本都有,大部分是无限制NODLL版,NODLL版本MT1420升级,大多数不可用!这些EA来源为国外花钱买过来的 如有需要,请联系站长! “EA测评”板块资源全部现有,看见不错的,可以联系站长,看EA在确定是否收费。 “无限制EA”板块,大部分免费,下载文件全部存在,都可以免费下载。 站长硬盘EA太多,因大部分时间做交易,做风控,没太多时间更新下载地址,请谅解! 需要更新下载文件,请联系站长微信!国外朋友请联系Telegram。  |
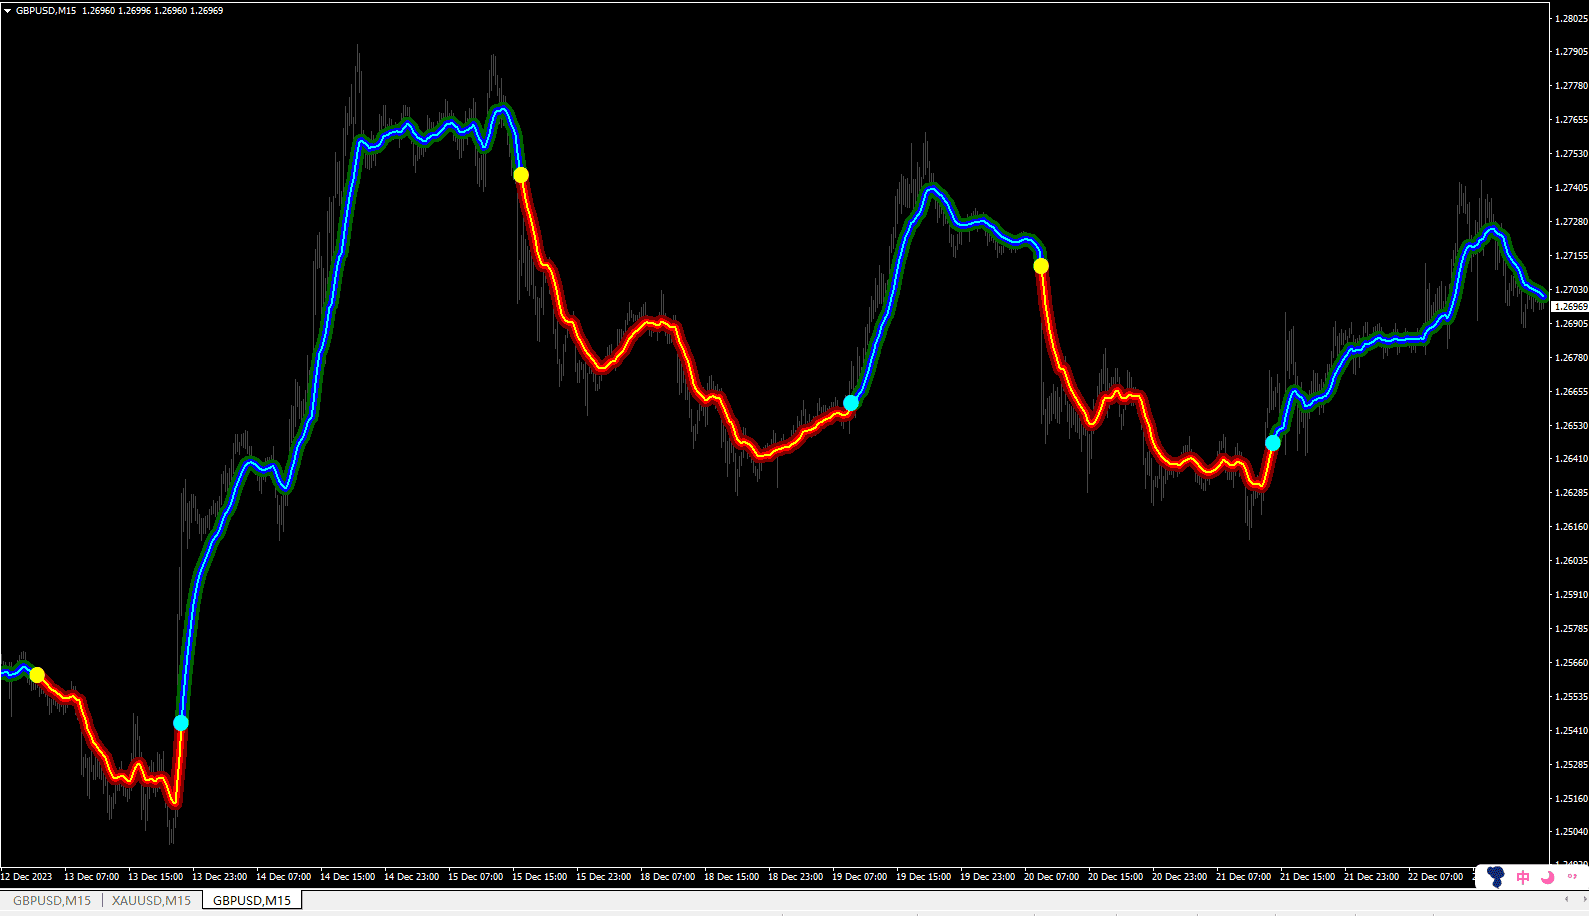
ToTheMoon is a multifunction robot, being configured according to your trade profile, being able to operate using a Grid and make average price, or in the Single Order and open only one order in each direction. You can also trade Multi Symbols on the same chart, trading the Symbols separately or using profits from one of them to reduze losses from the other.
LINK TO MY SIGNAL PRESETS:
https://drive.google.com/drive/folders/1cBglLYKxyyptYT_dnJhlxNy69MDC4Nsr?usp=drive_link
LINK TO OTHER ROBOT VERSIONS:
MT4: https://www.mql5.com/en/market/product/97963
MT5: https://www.mql5.com/en/market/product/97962
SOME EXAMPLES OF SIGNALS ON “mql5.com” BEING TRADED BY THE ROBOT, ALL MY SIGNALS ARE TRADED BY THE ROBOT, I ONLY CHANGE PRESET SETTINGS:
UpHill: Trading Only AUDCAD (Original Preset)
MT4: https://www.mql5.com/pt/signals/2023755
MT5: https://www.mql5.com/pt/signals/2023759
UpMountain: Trading Only AUDCAD
MT4: https://www.mql5.com/pt/signals/2006072
MT5: https://www.mql5.com/pt/signals/2006075
NoStress: Trading Only AUDCAD
MT4: https://www.mql5.com/pt/signals/2023750
MT5: https://www.mql5.com/pt/signals/2023752
EasyGoal: Trading Multi Symbols (EURUSD and AUDCAD)
MT4: https://www.mql5.com/pt/signals/1848932
MT5: https://www.mql5.com/pt/signals/1848940
RetireNow: Trading Multi Symbols (EURUSD and AUDCAD)
MT4: https://www.mql5.com/pt/signals/1018637
MT5: https://www.mql5.com/pt/signals/1018646
MajorForce: Trading Multi Symbols in Majors (EURUSD, GBPUSD, USDJPY, USDCAD, USDCHF, AUDUSD and NZDUSD)
MT4: https://www.mql5.com/pt/signals/1755221
MT5: https://www.mql5.com/pt/signals/1755222
SOME MAIN SETTINGS TO CREATE A PRESET:
· OPENING
Indicator of Opening Signal: DISABLED — ENVELOPES — BOLLINGER BANDS — KELTNER CHANNELS — MACD — RSI — PARABOLIC — STOCHASTIC — FORCE INDEX — ICHIMOKU — FRACTALS — OSMA — ADX — ATR — CCI — MOVING AVERAGES — VWAP — HILO — PIVOT POINT — SUPPORT RESISTANCE — MANUAL LINES — CANDLE SEQUENCE — PRICE GAP — FILTER ENVELOPES — FILTER BOLLINGER BANDS — FILTER ADX — FILTER ATR — FILTER VOLUME — FILTER CANDLE SIZE — FILTER PRICE GAP.
Multiply Lots and Monetary Values of this Preset: Do not Multiply — By Fixed Factor — By Factor Every 1000 Balance — By Factor Every 1000 Equity.
Initial Lot: Choose the Initial Lot.
· MULTI SYMBOLS
Trade Multi Symbols (Comma Separates EURUSD,GBPUSD): No, only Current Chart Symbol — Or choose Symbols separated by a Comma.
Profit Required to Close Multi Symbols ($): Choose the Resulting Profit Value to close Profit and Loss orders together.
· GRID MODE
Closing Mode (When Buy. Sell does the Opposite): Down / Up Total — Down / Up Initial — Down / Up Lot — Down / Up Half — Down / Up Divide — Down / Up Orders — All Down Profit / Up Total — All Down Profit / Up Initial — All Down Profit / Up Lot — All Down Profit / Up Half — All Down Profit / Up Divide — All Down Profit / Up Orders — Down / Other Total — Down / Other Initial — Down / Other Lot — Down / Other Half — Down / Other Divide — Down / Other Orders — All Down Profit / Other Total — All Down Profit / Other Initial — All Down Profit / Other Lot — All Down Profit / Other Half — All Down Profit / Other Divide — All Down Profit / Other Orders — Single Down with Profit — All Buys and Sells Together — All Buys or Sells.
TakeProfit (Points) (When you have only 1 Order): Choose the TakeProfit.
TakeProfit Grid (Points) (More than 1 Order) (0:TakeProfit): Choose the TakeProfit Grid.
TakeProfit Monetary ($) (Other Option) (0:Off >0:On): Choose the TakeProfit in Currency.
BreakEven (Points) (0:Off >0:On): Choose the BreakEven.
StopLoss (Points) (0:Off >0:On): Choose the StopLoss.
StopLoss Monetary ($) (Other Option) (0:Off >0:On): Choose the StopLoss in Currency.
Grid Step (Points): Choose the Grid Step.
Calculation of the Next Lot of the Grid: Always Initial Lot — Multiply by Factor — Add the Factor — Add Initial Lot — Subtract Initial Lot.
· SINGLE ORDER MODE
TakeProfit (Points): Choose the TakeProfit.
TakeProfit Monetary ($) (Other Option) (0:Off >0:On): Choose the TakeProfit in Currency.
BreakEven (Points) (0:Off >0:On): Choose the BreakEven.
StopLoss (Points) (0:Off >0:On): Choose the StopLoss.
StopLoss Monetary ($) (Other Option) (0:Off >0:On): Choose the StopLoss in Currency.
Calculation of the Next Lot after Gain: Always Initial Lot — Multiply by Factor — Add the Factor — Add Initial Lot — Subtract Initial Lot.
Calculation of the Next Lot after Loss: Always Initial Lot — Multiply by Factor — Add the Factor — Add Initial Lot — Subtract Initial Lot.
Closing Orders at Contrary Signal: Never — Only in Profit — Only in Loss — Ever
Indicator of Contrary Signal: The same indicator options.
· LIMITS (STOP)
· PERMITTED HOURS
· PERMITTED DAYS
· SIGNAL STRATEGY -> BUY: Follows chosen Indicator Strategy. SELL: Do the Opposite.
For the Opening Signal or Contrary Signal you have the following indicators: Envelopes, Bollinger Bands, Keltner Channels, MACD, RSI, Parabolic, Stochastic, Force Index, Ichimoku, Fractals, Osma, ADX, ATR, CCI, Moving Averages, VWAP , Hilo, Pivot Point, Support Resistance, Manual Lines, Candle Sequence, Price GAP, Filter Envelopes, Filter Bollinger Bands, Filter ADX, Filter ATR, Filter Volume, Filter Candle Size and Filter Price GAP. Being possible to use up to 5 of them at the same time, to define the buy or sell opening.
The Opening or Contrary signal is sent following the chosen indicator strategy, with the buy following what is defined, and the sell doing the opposite. For example, when choosing Envelopes and in the “Envelopes Strategy (On Buy)” option “Price Below Lower Envelope”, the buy will be made when the price is below the Lower Envelope, and the sell will be made when the price is above the Envelope Superior (contrary condition).
· FILTER STRATEGY -> Enables Buy and Sell Together by chosen Filter Strategy, so it needs a Signal to define the direction.
The difference between the Signal and the Filter is that the Signal indicates a direction for buying or selling, and the Filter indicates a good time to enter the market, not defining whether it is for buying or selling, therefore, when the Filter strategy occurs buying and selling together is enabled, so it is necessary to use it together with an indicator such as Signal to define the direction, with the Filter function only enabling market entry or not.
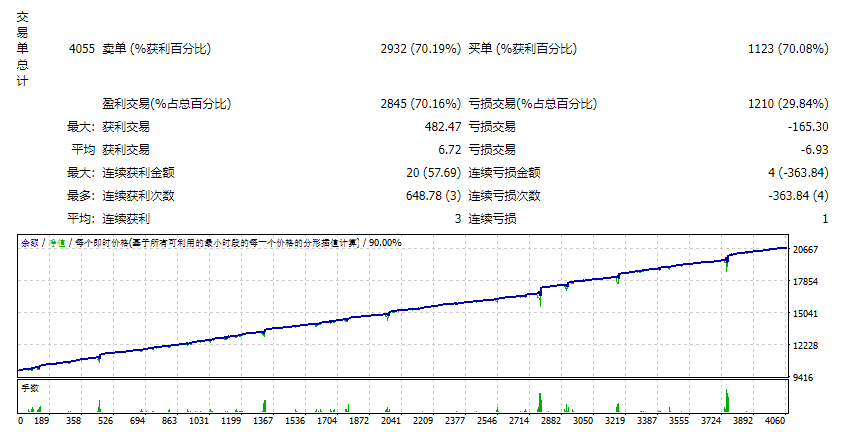
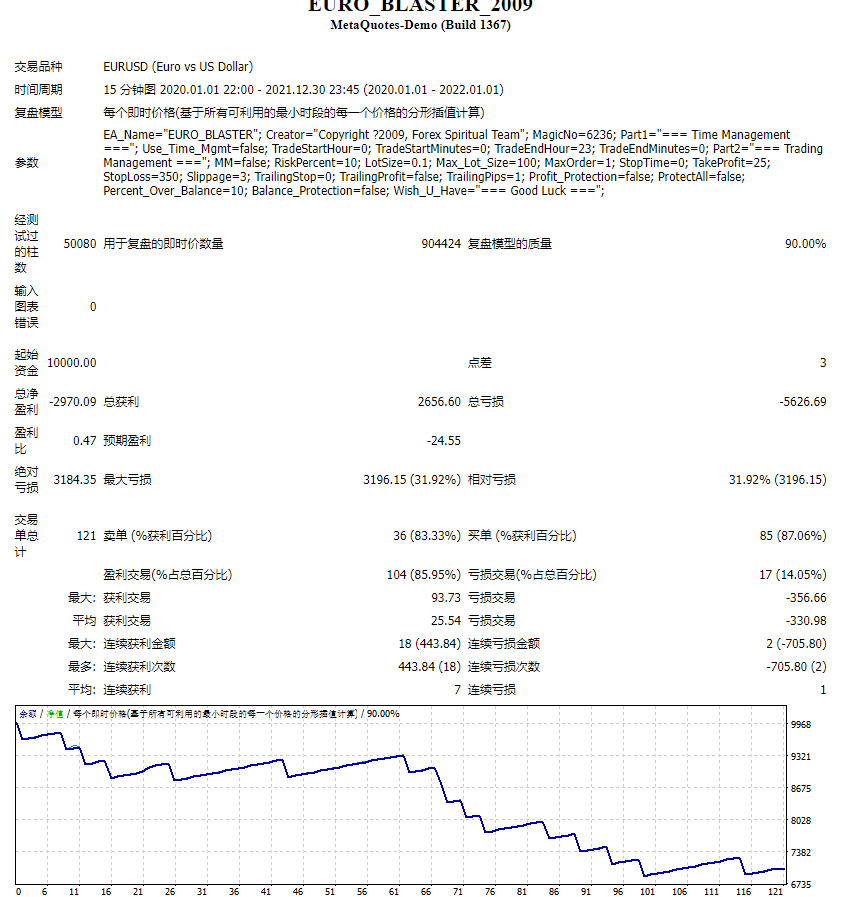
![图片[1]-ToTheMoon MT4 外汇EA-EA侦探社 - 全球领先的MQL5官网外汇EA机器人MT4自动化交易EA资源免费分享网站](https://sp-ao.shortpixel.ai/client/to_webp,q_glossy,ret_img/https://www.mql5.vip/wp-content/uploads/2024/05/20240514140029-66436e7df1a33.jpg)
![图片[2]-ToTheMoon MT4 外汇EA-EA侦探社 - 全球领先的MQL5官网外汇EA机器人MT4自动化交易EA资源免费分享网站](https://sp-ao.shortpixel.ai/client/to_webp,q_glossy,ret_img/https://www.mql5.vip/wp-content/uploads/2024/05/20240514140030-66436e7e1faa9.jpg)
![图片[3]-ToTheMoon MT4 外汇EA-EA侦探社 - 全球领先的MQL5官网外汇EA机器人MT4自动化交易EA资源免费分享网站](https://sp-ao.shortpixel.ai/client/to_webp,q_glossy,ret_img/https://www.mql5.vip/wp-content/uploads/2024/05/20240514140030-66436e7e424f1.jpg)
![图片[4]-ToTheMoon MT4 外汇EA-EA侦探社 - 全球领先的MQL5官网外汇EA机器人MT4自动化交易EA资源免费分享网站](https://sp-ao.shortpixel.ai/client/to_webp,q_glossy,ret_img/https://www.mql5.vip/wp-content/uploads/2024/05/20240514140030-66436e7e65843.jpg)
![图片[5]-ToTheMoon MT4 外汇EA-EA侦探社 - 全球领先的MQL5官网外汇EA机器人MT4自动化交易EA资源免费分享网站](https://sp-ao.shortpixel.ai/client/to_webp,q_glossy,ret_img/https://www.mql5.vip/wp-content/uploads/2024/05/20240514140030-66436e7e86580.jpg)