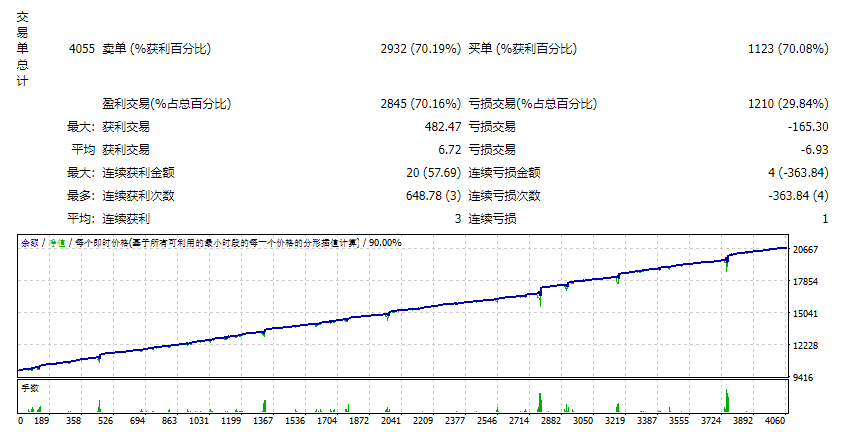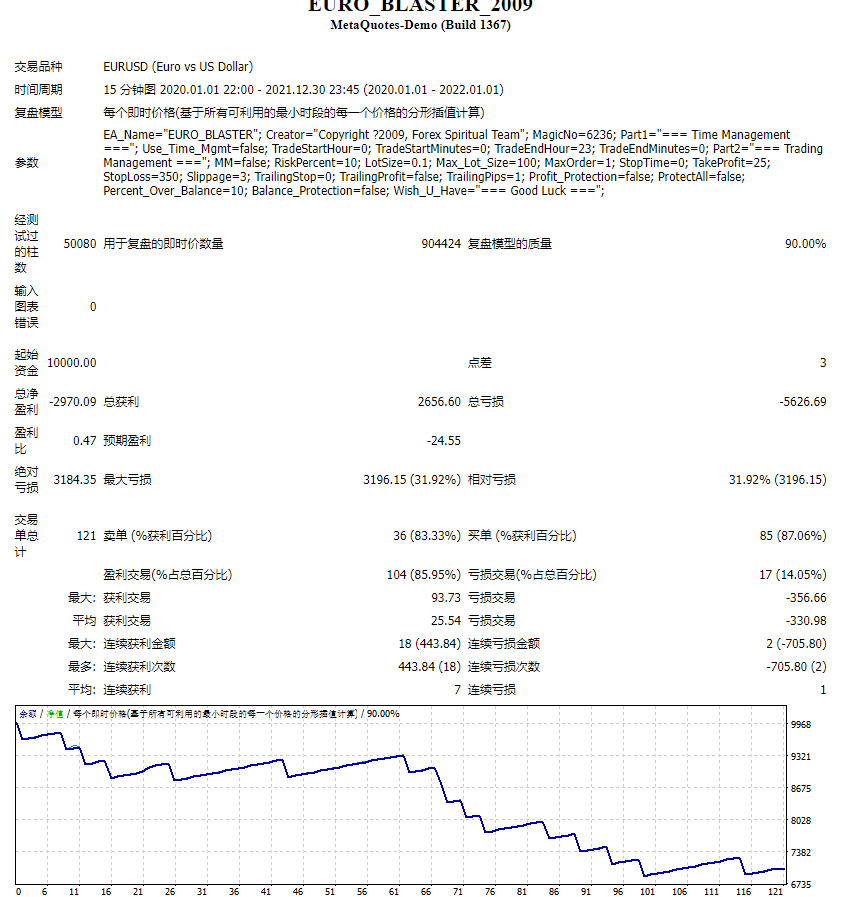
如果免费资源下载的文件为TXT文档 请联系站长更新!站长微信:Lv596999 Telegram:@eapoj “Mql5官网”板块的EA基本都有,大部分是无限制NODLL版,NODLL版本MT1420升级,大多数不可用!这些EA来源为国外花钱买过来的 如有需要,请联系站长! “EA测评”板块资源全部现有,看见不错的,可以联系站长,看EA在确定是否收费。 “无限制EA”板块,大部分免费,下载文件全部存在,都可以免费下载。 站长硬盘EA太多,因大部分时间做交易,做风控,没太多时间更新下载地址,请谅解! 需要更新下载文件,请联系站长微信!国外朋友请联系Telegram。  |
Critical Support and Resistance Demo is the demo version of Critical Support and Resistance which have full functionalities of the paid version, except only Pivot R1/R2/R3 and Daily Open will be triggered for alert and/or notification (full version has more critical support and resistance such as pivot support1/2/3, pivot resistance1/2/3, daily/weekly/monthly pivot, daily open, 100 round point, and previous daily high/low).
Please re-direct to LINK for full version.
Price is likely to pullback or breakout at important support and/or resistance. This indicator is designed to help you monitor these critical support and resistance area such as pivot support1/2/3, pivot resistance1/2/3, daily/weekly/monthly pivot, daily open, and 100 point (e.g. 1.1300 of EURUSD; 118.00 of EURJPY).
Features
- Ability to select usage of alert/notification function.
- Adjustable warning range for each type of critical support/resistance.
- Ability to select which critical support/resistance to use, by default, all of them are selected.
- Adjustable indicator panel position
Panel Object
Refer to screenshot1
- If support/resistance is not selected/used, cell will be repainted to be white
- If support/resistance is selected/used
- Price is out of warning zone, cell is repainted to be yellow
- Price is within warning zone, cell is repainted to be red
- To make panel looks clear and neat, it’s recommended to use blank template, please refer to screenshot2.
Input Parameters
- Send_alert
- True: send alert once price moves to area within warning zone
- False: no alert will be sent
- Send_Notification
- True: send notification once price moves to area within warning zone
- False: no notification will be sent
- Use Pivot Support
- True: pivot support cell panel will be repainted to be red, and alert/notification will be sent once price moves to area within pivot support warning zone
- False: no action will be triggered
- Pivot Support Warning Zone: the range of pivot support warning zone in unit of pips. e.g. If pivot R1 is 1.1300, and Pivot Support Warning Zone is set to be 10 (pips), then the Pivot Support Warning Zone would be the range from 1.1290 (1.1300 -10pips) to 1.1310 (1.1300 + 10pips).
- Use Pivot Resistance
- True: pivot resistance cell panel will be repainted to be red, and alert/notification will be sent once price moves to area within pivot resistance warning zone
- False: no action will be triggered
- Pivot Resistance Warning Zone: the range of pivot resistance warning zone in unit of pips. Please refer to example of Pivot Support Warning Zone.
- Use Daily/Weekly/Monthly Pivot
- True: daily/weekly/monthly pivot cell panel will be repainted to be red, and alert/notification will be sent once price moves to area within daily/weekly/monthly pivot warning zone
- False: no action will be triggered
- Daily/Weekly/Monthly Pivot Warning Zone: the range of daily/weekly/monthly pivot warning zone in unit of pips. Please refer to example of Pivot Support Warning Zone.
- Use Daily Open
- True: daily open cell panel will be repainted to be red, and alert/notification will be sent once price moves to area within daily open warning zone
- False: no action will be triggered
- Daily Open Warning Zone: the range of daily open warning zone in unit of pips. Please refer to example of Pivot Support Warning Zone.
- Use Buy/Sell at 100
- True: ‘100’ cell panel will be repainted to be red, and alert/notification will be sent once price moves to area within ‘100’ warning zone
- False: no action will be triggered
- Buy/Sell at 100 Warning Zone: the range of 100 warning zone in unit of pips. Please refer to example of Pivot Support Warning Zone.
- X_axis:dashboard x position
- Y_axis: dashboard x position
Note
- Once alert/notification of a particular support/resistance has been sent, the next alert/notification of that support/resistance will be sent after 5 minutes upon warning zone. The alert and notification are implemented in this way to make sure you receive them once during a certain period instead of numerous alerts/notification coming to you continuously.
If you have any customized request and/or suggestion, please feedback to me.
![图片[1]-Critical Support and Resistance Panel Demo 外汇EA-EA侦探社 - 全球领先的MQL5官网外汇EA机器人MT4自动化交易EA资源免费分享网站](https://sp-ao.shortpixel.ai/client/to_webp,q_glossy,ret_img/https://www.mql5.vip/wp-content/uploads/2024/05/20240514184921-6643b231a0906.png)